
|
|
|
|
|||
Please read through this help material before filling in the Online Course Selection Form.
2010 - 2011 Course Selection Schedule - First Semester Add-Drop Period
| Online Course Information Available for Planning Your Courses | From Aug 12, 2010, 10 a.m. |
| Course Selection Period | Sep 1, 2010, 10 a.m. - Sep 14, 2010, 4 p.m. |
| Suspension Period (Course Selection will not be available) | Sep 6, 2010, 9 a.m. - 1 p.m.
Sep 13, 2010, 9 a.m. - 1 p.m. |
| Online Course Information Available for Planning Your Courses | From Jul 29, 2010, 10 a.m. |
| Course Selection Period | Sep 1, 2010, 10 a.m. - Sep 14, 2010, 4 p.m. |
| Suspension Period (Course Selection will not be available) | Sep 6, 2010, 9 a.m. - 1 p.m.
Sep 13, 2010, 9 a.m. - 1 p.m. |
| Online Course Information Available for Planning Your Courses | From Jul 29, 2010, 10 a.m. |
| Course Selection Period | Sep 1, 2010, 10 a.m. - Sep 14, 2010, 4 p.m. |
| Suspension Period (Course Selection will not be available) | Sep 6, 2010, 9 a.m. - 1 p.m.
Sep 13, 2010, 9 a.m. - 1 p.m. |
| Online Course Information Available for Planning Your Courses | From Aug 12, 2010, 10 a.m |
| Course Selection Period | Sep 1, 2010, 10 a.m. - Sep 14, 2010, 4 p.m. |
| Suspension Period (Course Selection will not be available) | Sep 6, 2010, 9 a.m. - 1 p.m.
Sep 13, 2010, 9 a.m. - 1 p.m. |
| Online Course Information Available for Planning Your Courses | From Jul 29, 2010, 10 a.m. |
| Course Selection Period | Sep 1, 2010, 10 a.m. - Sep 14, 2010, 4 p.m. |
| Suspension Period (Course Selection will not be available) | Sep 6 2010, 9 a.m. - 1 p.m.
Sep 13, 2010, 9 a.m. - 1 p.m. |
| Online Course Information Available for Planning Your Courses | From Jul 29, 2010, 10 a.m. |
| Course Selection Period | Sep 1, 2010, 10 a.m. - Sep 14, 2010, 4 p.m. |
| Suspension Period (Course Selection will not be available) | Sep 6, 2010, 9 a.m. - 1 p.m.
Sep 13, 2010, 9 a.m. - 1 p.m. |
| Online Course Information Available for Planning Your Courses | From Aug 12, 2010, 10 a.m |
| There is no add/drop period available. Please contact the Faculty of Education for any changes on your course selection. |
|
| Online Course Information Available for Planning Your Courses | From Jul 29, 2010, 10 a.m. |
| There is no add/drop period available. Please contact the Faculty of Education for any changes on your course selection. |
|
| Online Course Information Available for Planning Your Courses | From Jul 29, 2010, 10 a.m. |
| There is no add/drop period available. Please contact the Faculty of Education for any changes on your course selection. |
|
| Please refer to Graduate School for details. | |
| For any questions, please contact Graduate School on 2857 3470 or by email to gradsch@hkucc.hku.hk. |
In Preparation for Course Selection
You can refer to the optional course list and corresponding time table of your curriculum BEFORE course selection begins.
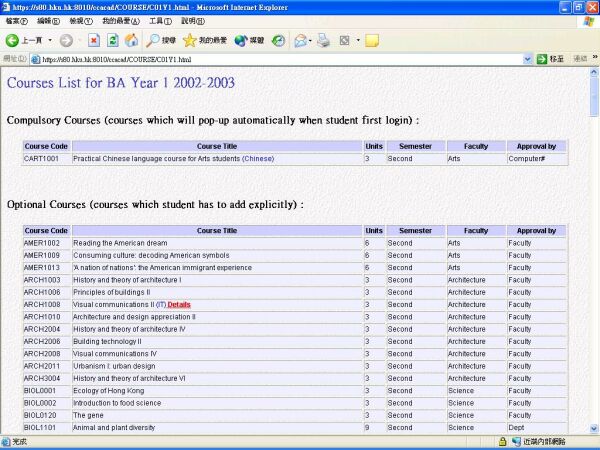
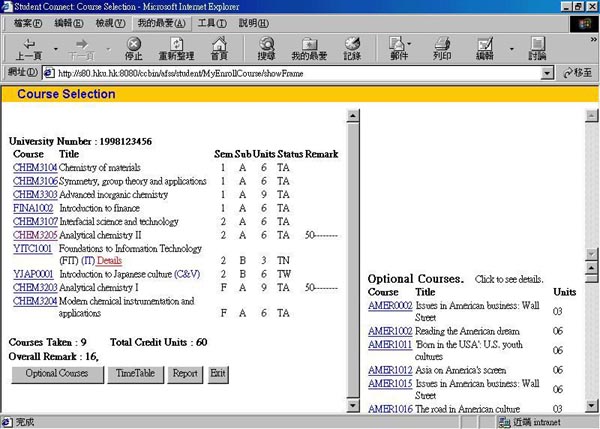
Optional Course List
A list of compulsory courses and optional courses belongs to your curriculum are available for your reference in advance. You can take a look to them and select those you are interested first.
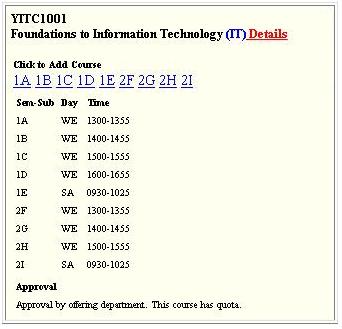
You can click 'Details' to see additional information of the corresponding courses if presents. You can click the course code to see its corresponding time-table as well.
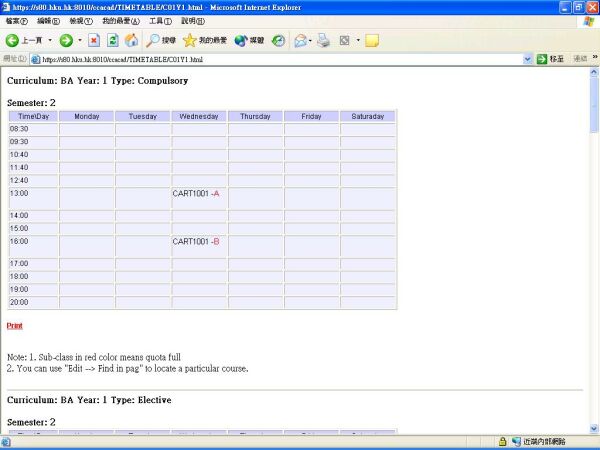
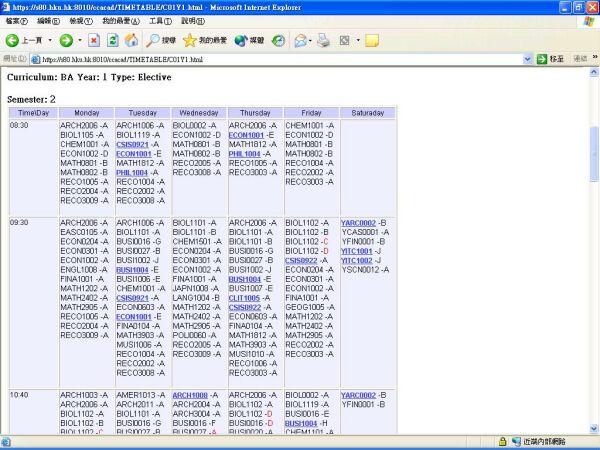
Optional Course Timetable
After selecting your interested courses, you can refer to the timetable to see any time clash. They are divided into two tables by compulsory courses and elective courses.
For each time slots, you can see a list of course code and corresponding sub-class that have its time schedule belongs to that time slots. You can click the course code to see additional information of the corresponding courses if presents.
During add-drop period, when the sub-class is red in color, it means that sub-class is full already. Sometimes, you can't find your selected course in the timetable because the faculty which offer that course do not provide the corresponding
information to the system. You may contact the corresponding faculty for the updated timetable.
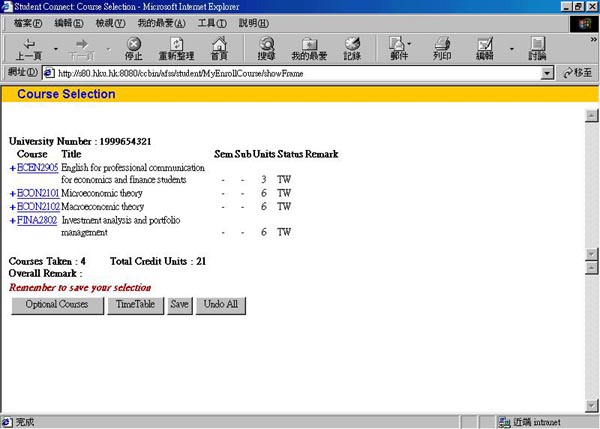
The Course Selection Form is divided into 3 parts.
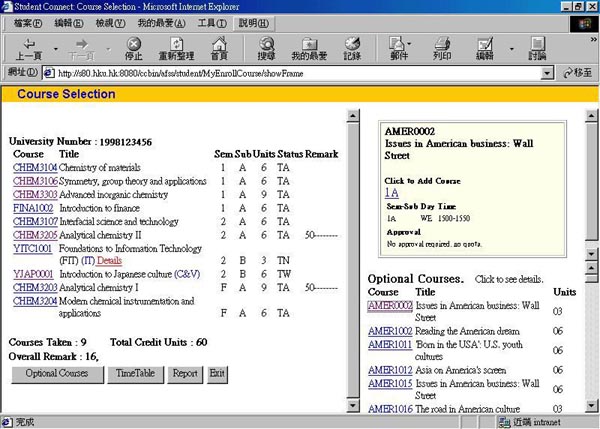
When the first time you start the Course Selection Form, some courses may be pre-assigned for you. These are the compulsory courses. Please select the semester and sub-class before you can save successfully.
For those core courses that are elective within a small group (say, must take 2 out of 4 courses), you have to add them individually from the optional course list.
3. Selecting the semester / sub-class
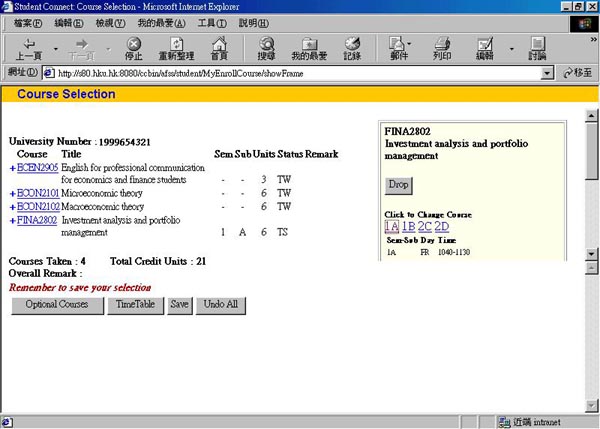
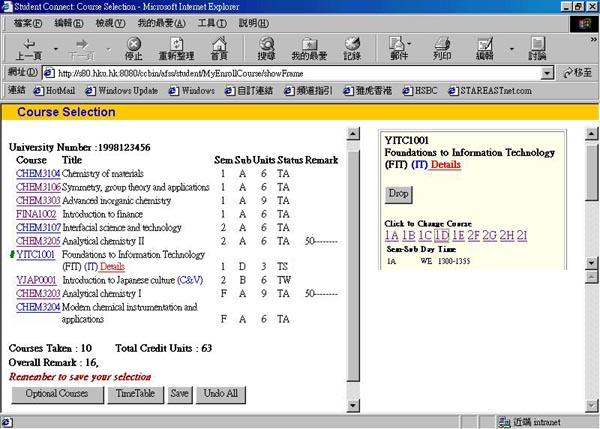
Some preloaded (compulsory) courses are being offered in both semesters, or they are divided into several sub-classes. For these courses, which are labelled '+' in the course list, with sem/sub labelled '-', you have to decide which semester & sub-class you will take.
To do this, click the course code in your selected course list, course details will be shown on the top right, then click the appropriate semester & sub-class option (e.g.. 1A means semester 1, sub-class A). The details will be transferred to your selected course list. Remember to save your selection after selecting semester & subclass of ALL courses.
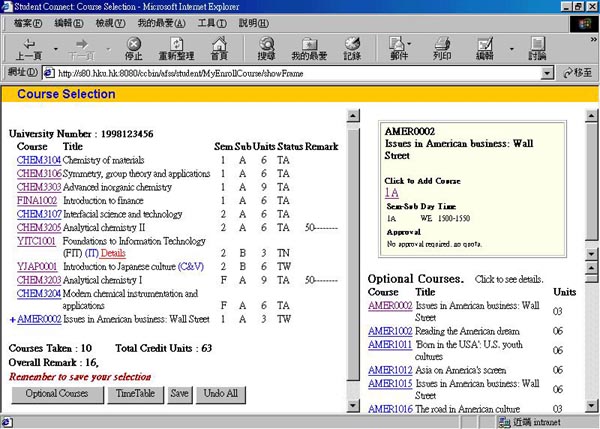
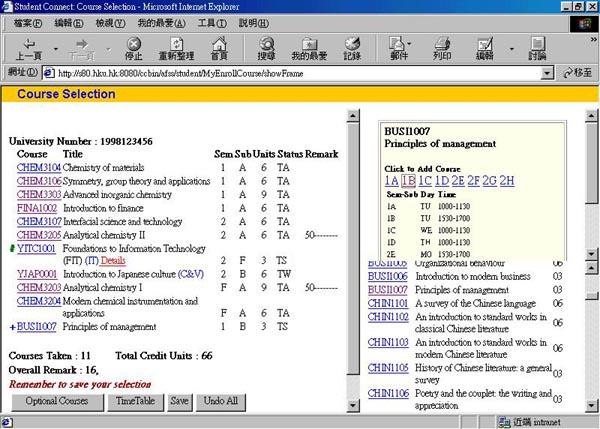
To add a course beside compulsory courses, simply click the Optional Courses button at the bottom. An Optional Course List will be shown on the bottom right.
In the Course List Frame, locate the course which you want to take and click the course code (which is blue in colour and underlined). The course details will be displayed on top of the Course List Frame.
You can click the appropriate semester-subclass option (e.g.. 1A) in order to add the course. After that, the course will be transferred to your course selection list on the left. A blue plus sign (+) will appear beside the newly added courses. Same course with same semester but different sub-classes CANNOT be added. Repeat this step for other courses which you want to take.
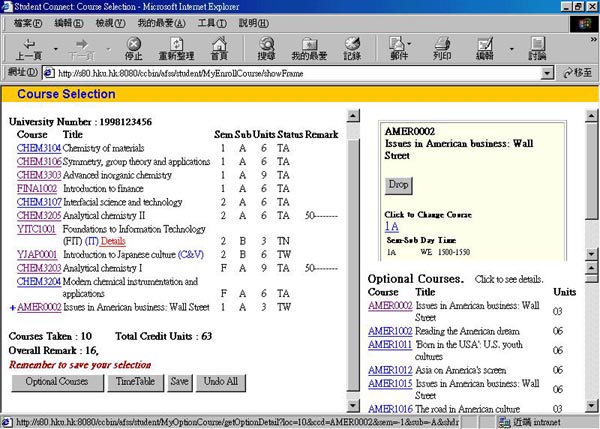
To remove a course from the course selection list, click the course code in the selected course list, then click the Drop button in the course detail box. If the course you want to remove is one of the pre-assigned course, a red minus sign (-) will appear next to the course code. The course will be removed when you click the Save button.
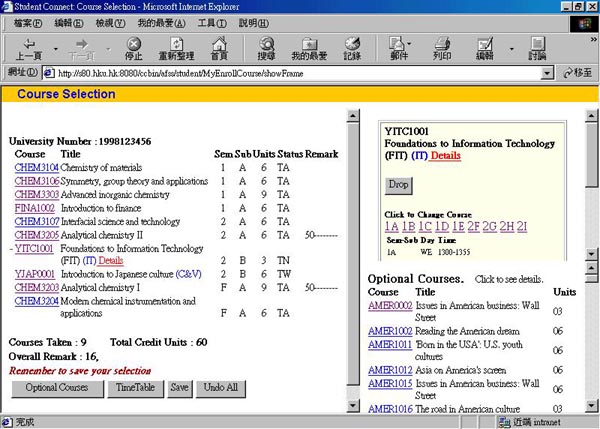
If the course you want to remove is just added by you and has not been saved yet, it will disappear immediately.

If you cannot find the "Drop" button in the course you want to remove, it is due to the fact that the course is freezed by your home faculty which do not allow student to drop this course. You many contact your faculty for permission to un-freeze the course for you before you are allowed to drop it.
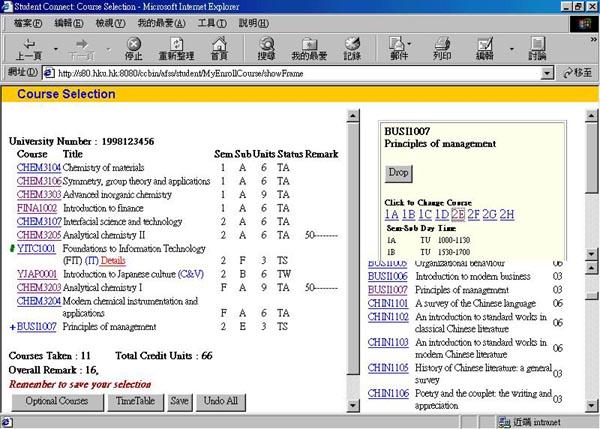
6. Change the semester & sub-class
To change the semester & sub-class of a course from the course selection list on the left (NOT the optional course list on the right), click the course code in the selected course list, then click the appropriate semester & sub-class option in the course detail box. If the course you want to change sub-class is one of the pre-assigned course, '#' will appear next to the course code. It will be updated when you click the Save button.
If the course you want to change is just added by you (with '+' sign) and has not been saved yet, it will be updated without changing the sign to '#'.
7. Saving your course selection
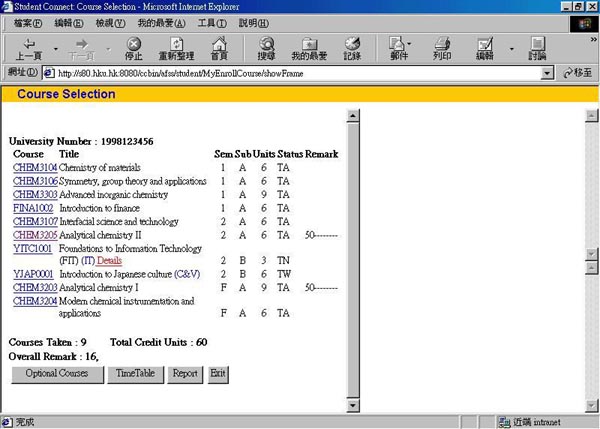
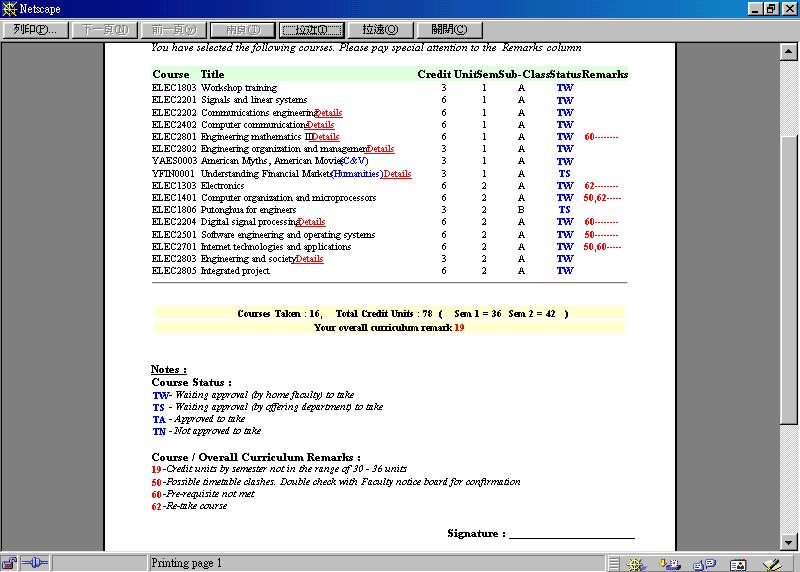
After you have added all the courses you are required to take or done any other changes (change semester-subclass or drop courses), remember to click the Save button to save your work. After saving your course selection, some conflict remarks ( at the end of the corresponding course code - Remark column and/or above the 'Optional Course' button - Overall Remark) may appear. You can match the remark codes (those in red color) with the course remarks and overall curriculum remarks in your Course Selection Report. Consider the conflicts and try to resolve them. If you have any problems in resolving the conflicts, please contact your faculty.
Remarks, Overall Remarks
8. Checking the course selection
After saving you course selection, you can view the Course Selection Report by clicking the Report button. A brief report will be shown. Check carefully the course selection to see if any course is missing. Also, please note if any conflict exists. If there are conflicts, you may consult the faculty to see if they are acceptable.
9. Exit the Course Selection Form
Click the Exit button and you will return to the Student Connect Main Menu. Finally, remember to LOGOUT your Student Connect Account if you have finished all your work under Student Connect. Otherwise, you may have the risk of your account being abused by others.
If you login through HKU Portal,
Other References
Last Updated on Jul 8, 2010.
Computer Centre, The University of Hong Kong